博客搭建
hugo
Hugo官方网站:https://gohugo.io
本文以PaperMod主题为例,官方文档:Installation · adityatelange/hugo-PaperMod Wiki (github.com)
需求准备
Hugo:Releases · gohugoio/hugo (github.com)
安装步骤
1.解压压缩包
2.配置环境变量
D:\Env\hugo_0.83.1
3.初始化博客
官方文档推荐我们使用易读性更高的yml格式初始化博客。
hugo new site <name of site> -f yml
4.指定主题
在config.yml文件中设置主题。
theme: PaperMod
5.本地启动
先在本地看看网站跑起来的效果
hugo server
6.创建GitHub仓库
具体操作详见之后的hexo主题教学。
7.修改baseUrl
将config.yml文件中的baseUrl修改为刚刚创建的仓库。
baseURL: "https://<username>.github.io/"
8.生成public文件夹
public中包含所有静态页面的内容,我们需要生成这个文件夹并上传到远程仓库中,完成博客部署。
hugo
9.push到远程仓库
# 配置代理
git config --global http.proxy socks5://127.0.0.1:<port>
git config --global https.proxy socks5://127.0.0.1:<port>

# 更改默认分支
git push -u origin main

# push文件
cd public
git init
git add .
git remote add origin https://github.com/<username>/<username>.github.io.git
git commit -m "first commit"
git push -u origin main
更新博客
# 重新生成public文件夹
hugo

# 重新push到GitHub
cd public/
git init
git add .
git commit -m "修改内容"
git push -u origin main
俗话说,偷懒是第一创造力,上面的命令完全可以写一个bash脚本,这里命名为deploy.sh。
# !/bin/bash
hugo
cd public
git add -A && git commit -m "update" && git push -u origin main
写好bash脚本后,记得chmod +x deploy.sh给脚本执行权限
日常排错
在push的时候报错了,报错如下:
 ! [rejected]        main -> main (fetch first)
error: failed to push some refs to 'https://github.com/oopsdc/oopsdc.github.io.git'
hint: Updates were rejected because the remote contains work that you do
hint: not have locally. This is usually caused by another repository pushing
hint: to the same ref. You may want to first integrate the remote changes
hint: (e.g., 'git pull ...') before pushing again.
hint: See the 'Note about fast-forwards' in 'git push --help' for details.
出错原因:
GitHub中有文件不在本地代码目录中。
解决方案:
# 进行代码合并
git pull --rebase origin main
常用命令
生成文章
hugo new --kind post <name>
hexo
需求准备
git:https://git-scm.com/node.js:http://nodejs.cn/
git --version # 检测git是否安装成功
node -v # 检测nodejs是否安装成功
连接GitHub
为方便后续操作,之后的命令使用gitbash
代理设置
方法一:通过命令写配置,具体端口可查看代理软件,默认情况v2ray为10808,clash为7890:
git config --global http.proxy socks5://127.0.0.1:<port>
git config --global https.proxy socks5://127.0.0.1:<port>
方法二:直接更改gitconfig文件:
vim ~/.gitconfig

[http]
        proxy = socks5://127.0.0.1:7890
[https]
        proxy = socks5://127.0.0.1:7890
配置个人信息
git config --global user.name "<username>"
git config --global user.email "<email>"
生成SSH
ssh-keygen -t rsa -C "<email>" # 后续选项默认回车
该命令会在用户文件夹下的.ssh文件夹生成id_rsa和id_rsa.pub文件,前者为私钥,后者为公钥。接下来我们把公钥提交到GitHub。
cat ~/.ssh/id_rsa.pub # 查看公钥
登录GitHub:
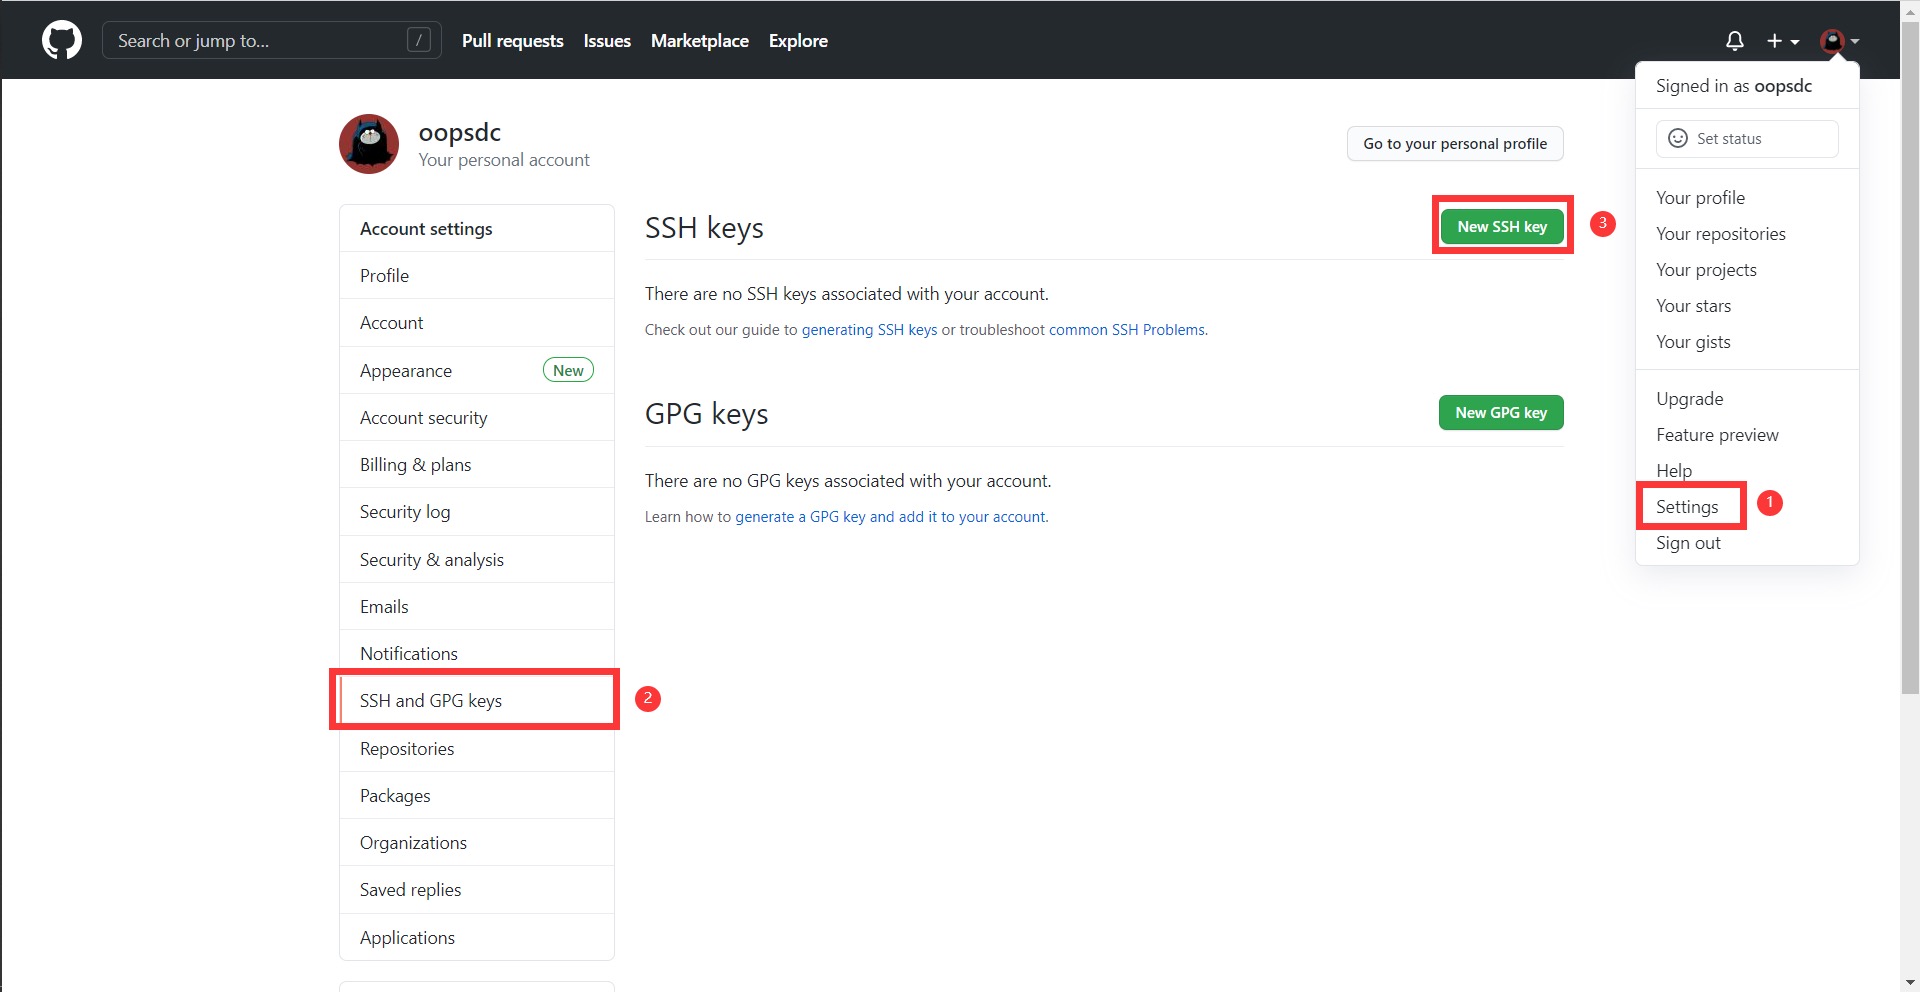
取一个合适的名称,将cat命令查看到的内容粘贴进去。
完成上述步骤后我们检查一下连接是否成功:
ssh -T [email protected] # 出现后续的提示即为连接成功
# Hi oopsdc! You've successfully authenticated, but GitHub does not provide shell access.
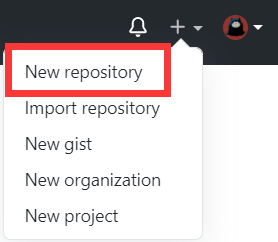
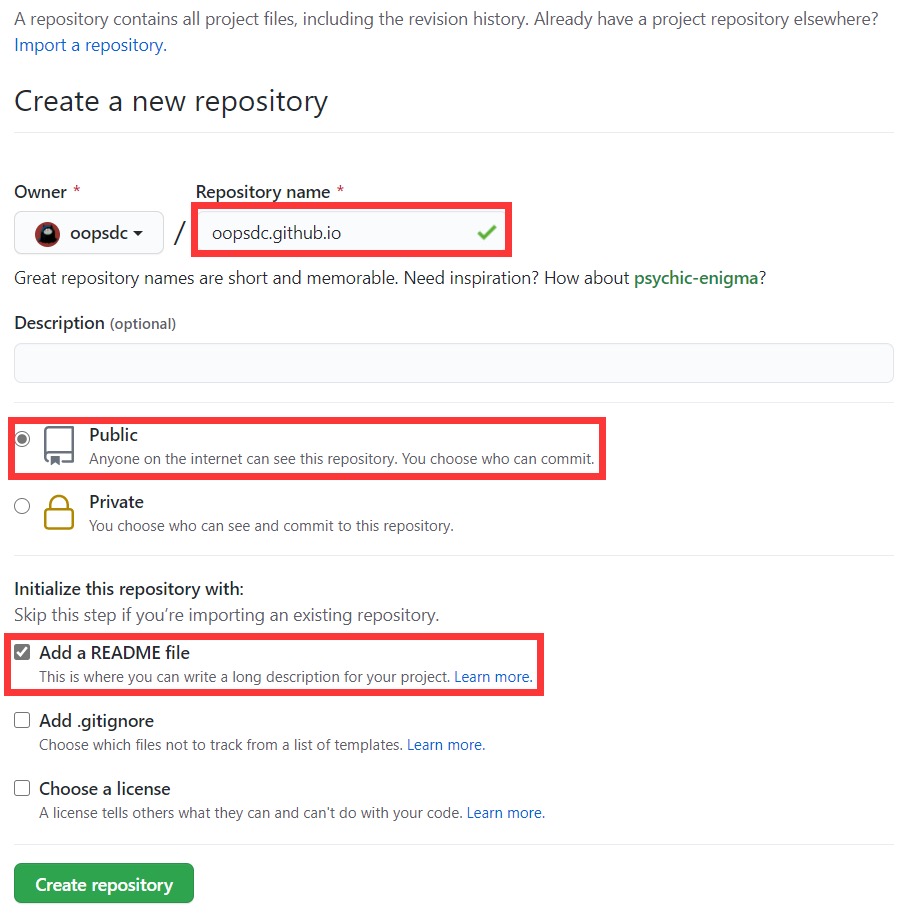
创建博客仓库
博客部署
安装hexo
npm i hexo-cli -g # 全局安装
初始化博客文件夹
hexo init <blog-name>
cd <blog-name> # 切换到博客根目录
npm install # 安装依赖
本地启动
hexo s # hexo server命令简写
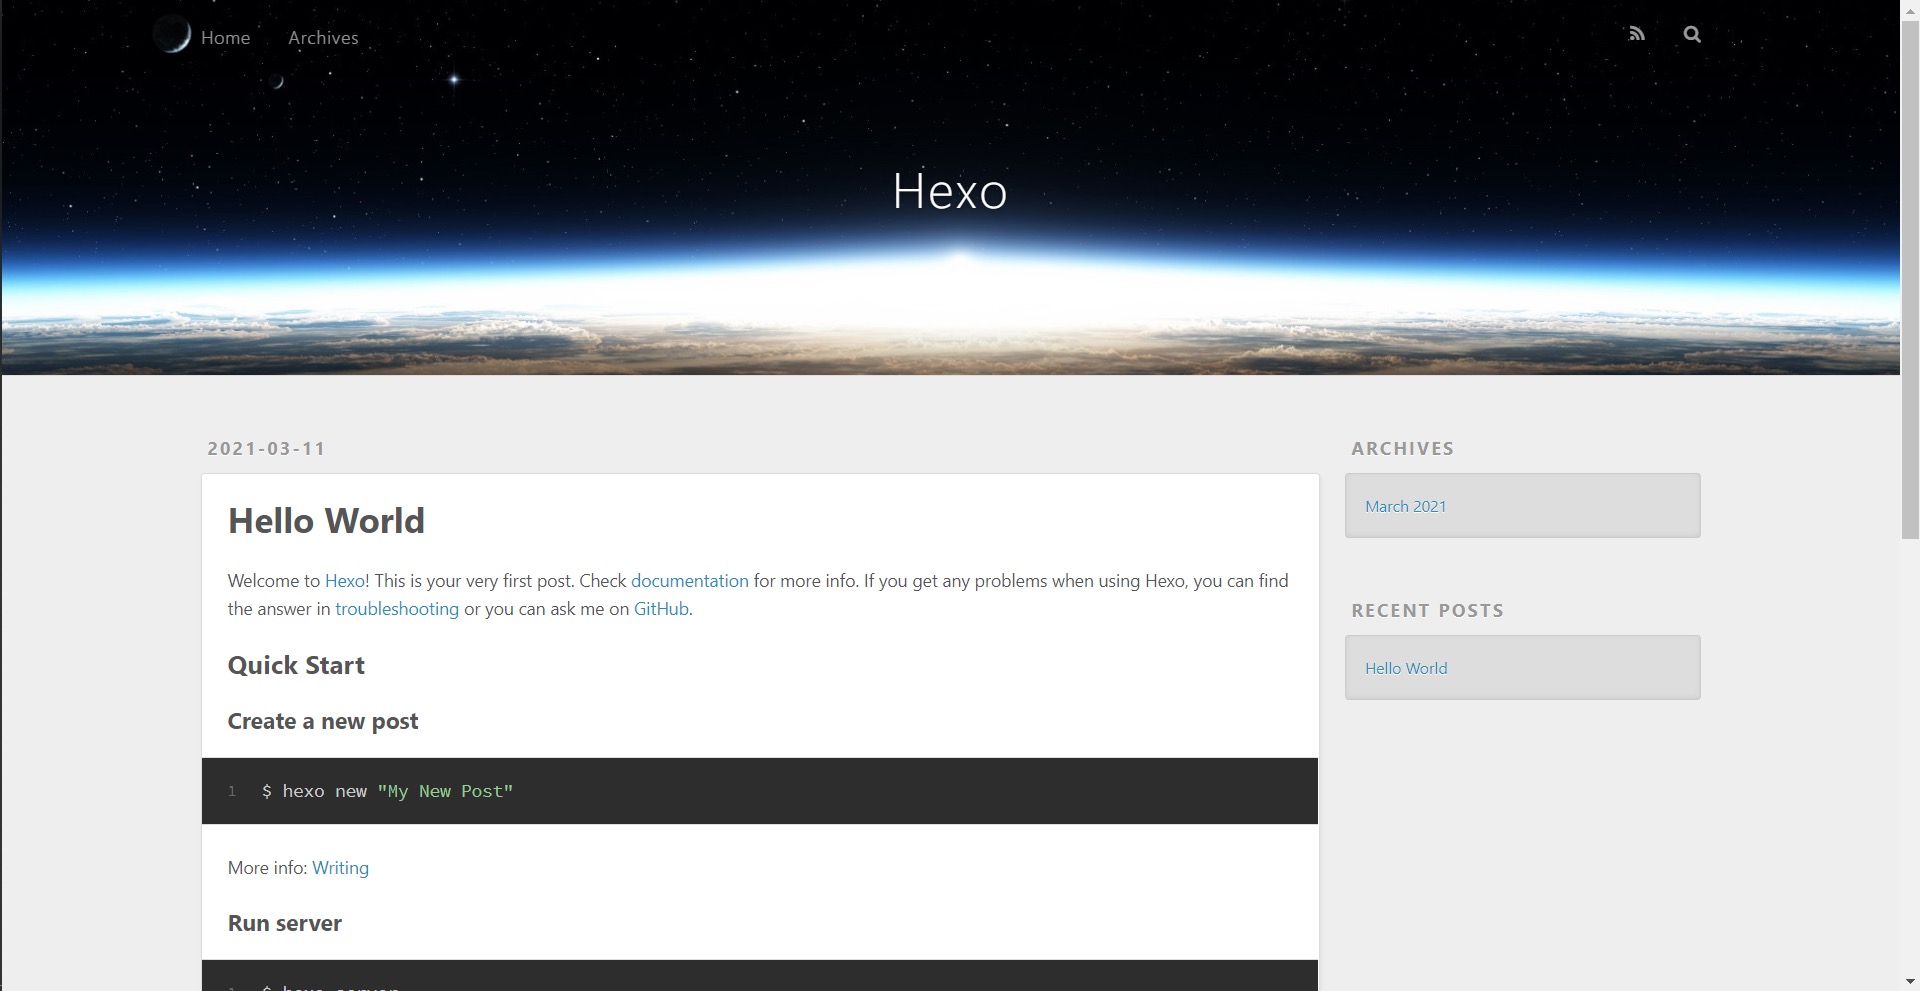
我们可以看到博客本地部署成功,接下来就是换主题。
本文以yun主题为例:
项目官网:
主页 | Hexo-Theme-Yun (yunyoujun.cn)
GitHub项目地址:
下载后将文件解压,将文件夹重命名为yun。
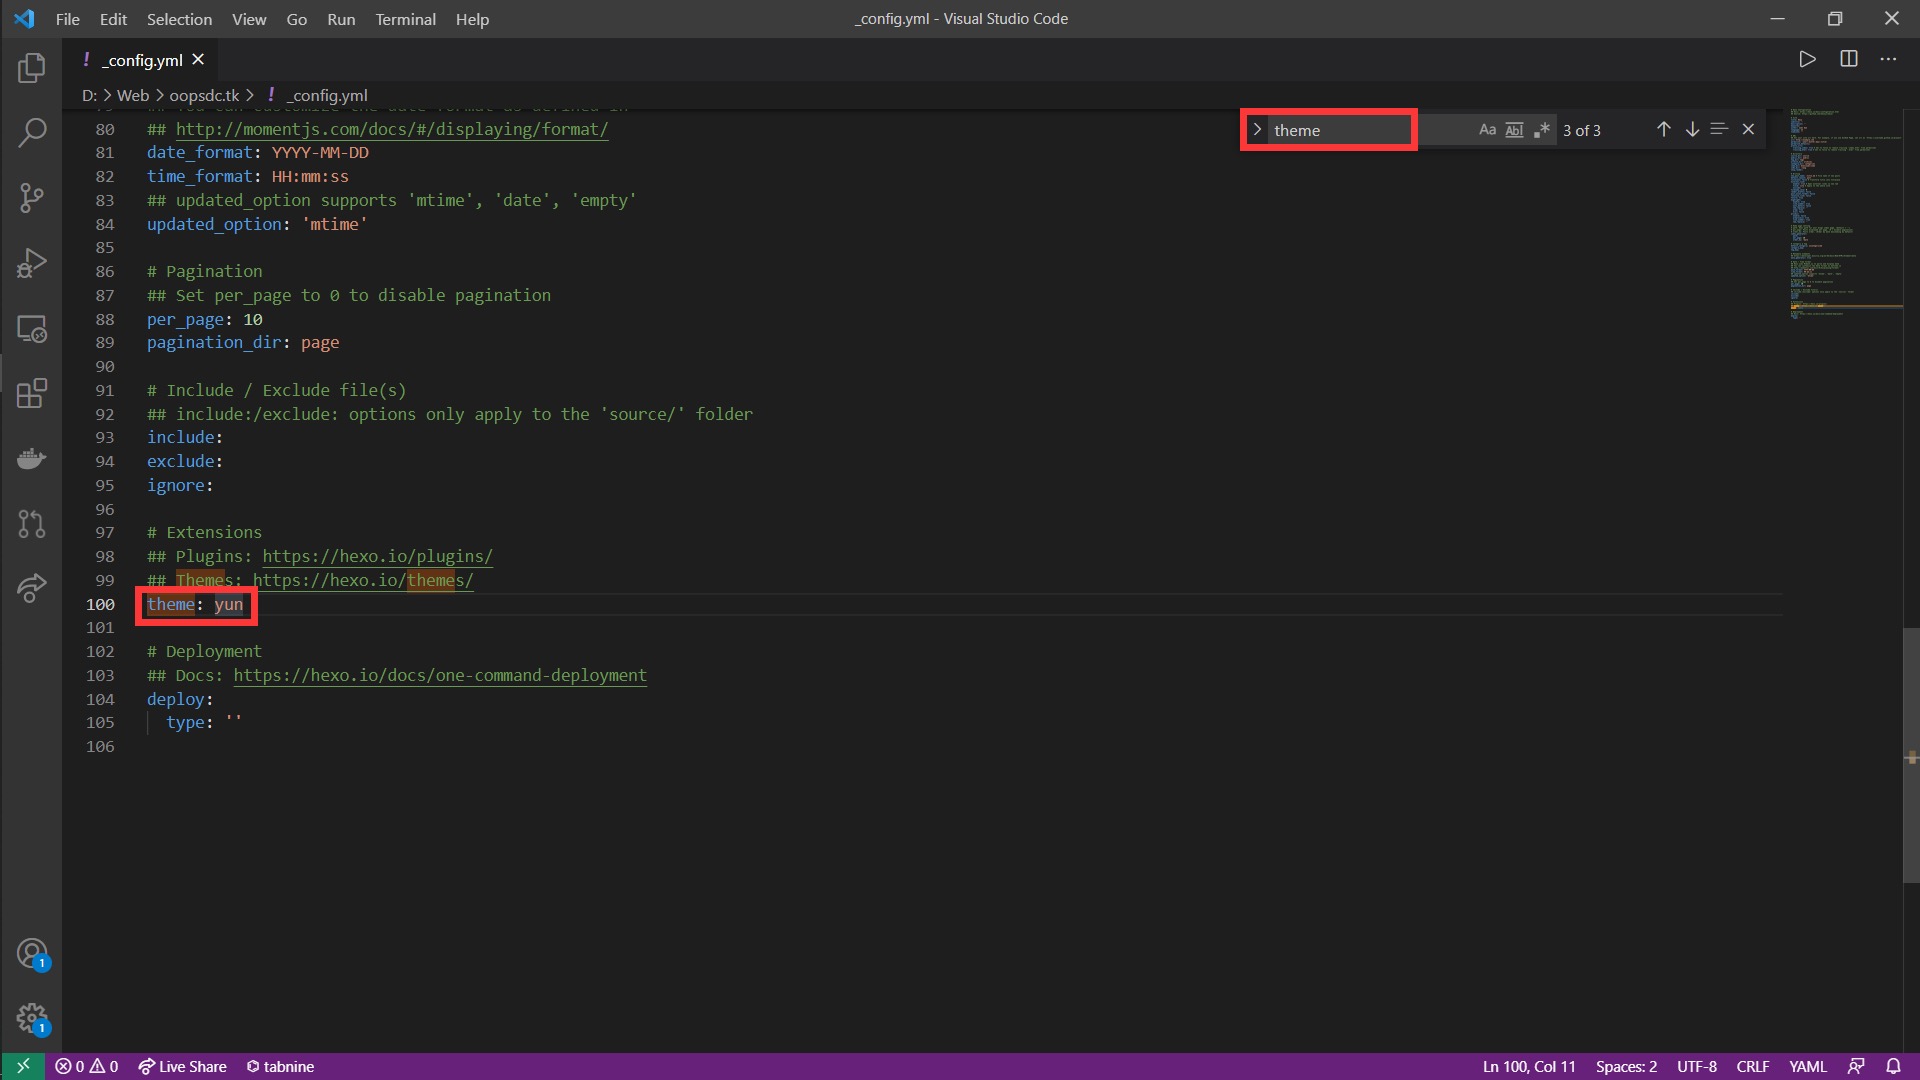
修改博客根目录下的_config.yml文件,自定义主题,此处填写的主题名就是我们刚刚解压缩的文件夹名称。
Ctrll+F搜索theme,然后进行修改:
完成上述步骤后,我们返回gitbash,Ctrl+C结束当前调试,重新运行本地文件。
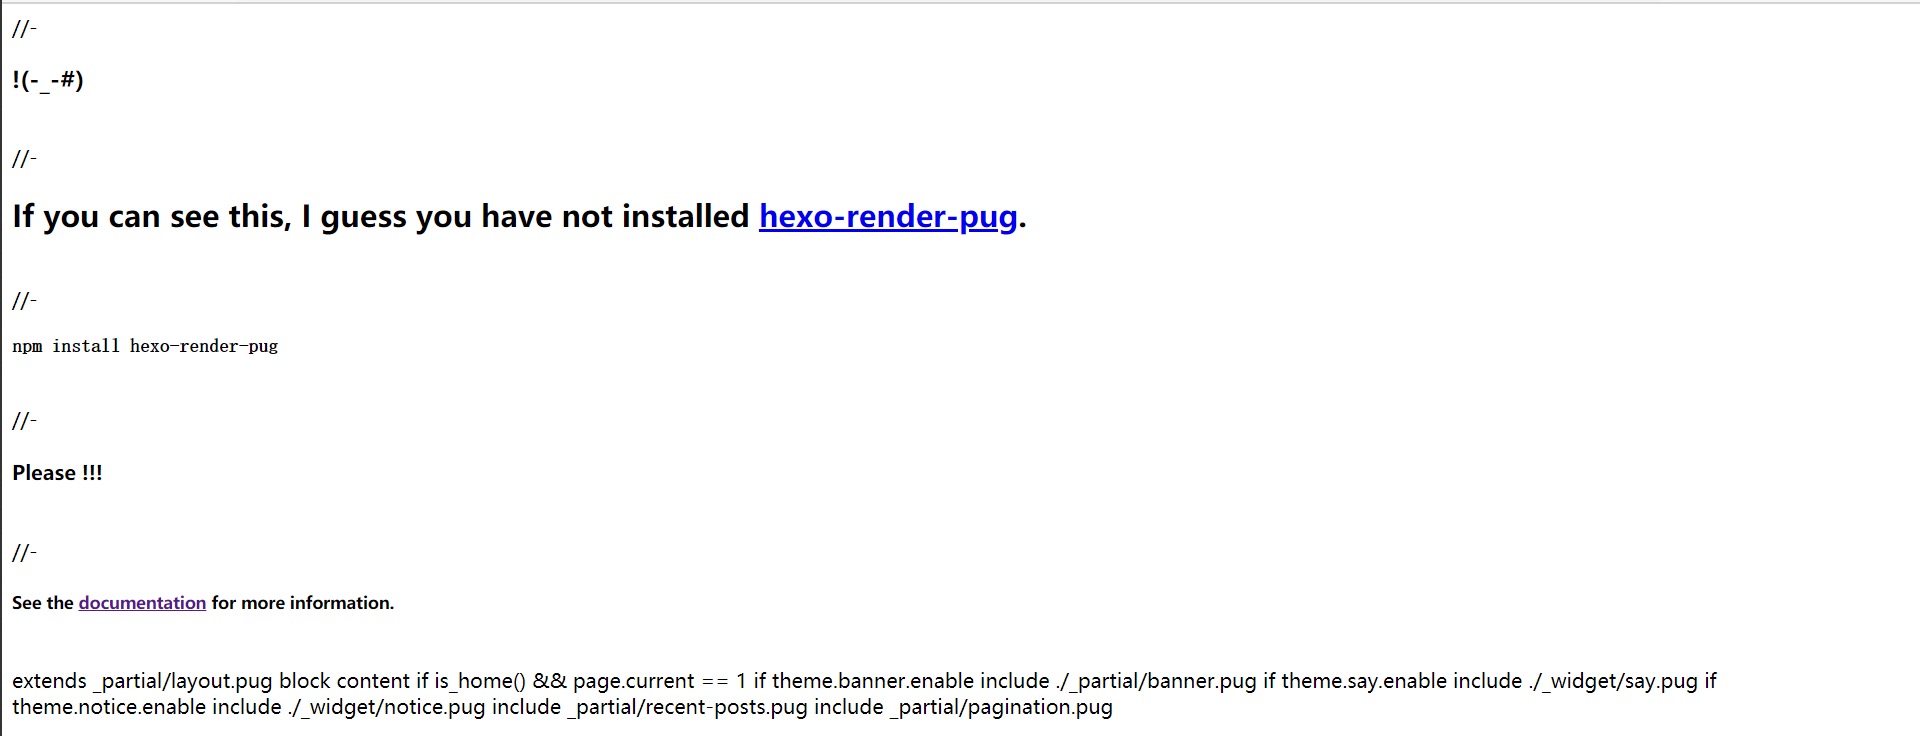
刷新网页后看到了这个报错,按照提示安装hexo-render-pug即可:
npm install hexo-render-pug
在安装过程中还有其它提醒:
# Please, upgrade your dependencies to the actual version of core-js@3.
# found 1 high serverity vulnerablity
run `npm audit fix` to fix them, or `npm audit` for details
依次解决:
npm install --save -g core-js@^3
npm audit fix
安装后依旧报错:
WARN No layout: index.html
查了资料,不缺插件,文件夹也是正确的,实在不知道什么错,就在_config.yml和theme下分别把yun和yun文件夹都改为了theme-yun,然后正常运行。但是改回yun又会报错…先暂时不讨论这个问题了。
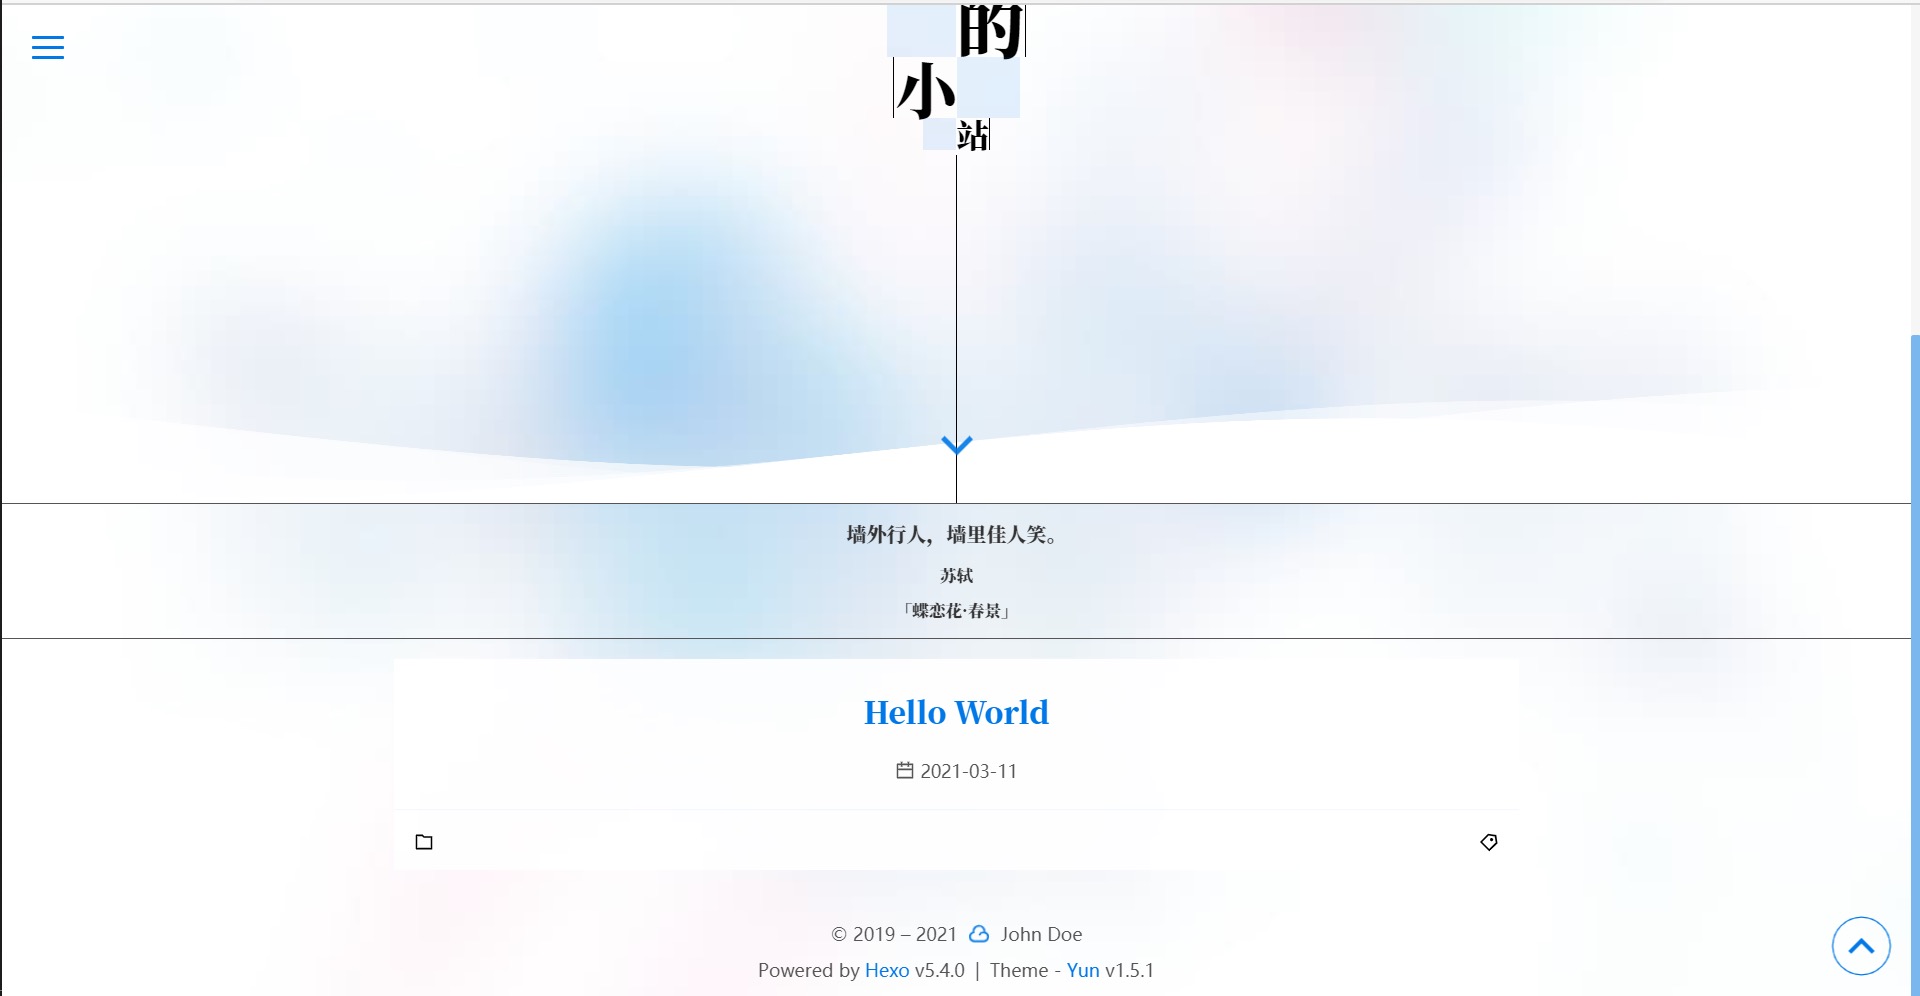
这就是博客初始页面。
剩下的完全可以按照官方文档自己操作,自定义想要的功能。
修改完且本地测试无误后,我们就可以正式把博客发布到GitHub上了。
部署博客
首先还是编辑根目录下的_config.yml文件,直接翻到最后。
deploy:
	type: 'git'
	repository: https://github.com/<username>/<usernmae>.github.io
	branch: main
部署博客需要使用命令hexo deploy,但需要安装对应平台的插件。
以GitHub为例,安装如下:
npm install hexo-deployer-git --save
本地测试没有问题时,即可部署,部署时建议先清除以往数据并重新生成,避免未知错误。
hexo clean && hexo g -d
配置域名
首先自己去买一个,然后按照对应的官方文档设置DNS等参数,然后点击博客仓库的Settings→GitHub Pages→Check it out here!,之后自定义域名即可。
hexo常用命令
hexo clean # 清除已生成的静态站点文件
hexo generate # 生成静态站点文件,生成内容在public文件夹内
hexo g # 上一条命令的简写
hexo server # 启动本地服务器
hexo s # 上一条命令的简写
hexo deploy # 生成静态站点文件后部署网站
hexo clean && hexo g && hexo s # 本地测试
升级hexo
# 使用淘宝源的cnpm替换npm
npm install -g cnpm --registry=https://registry.npm.taobao.org

cnpm install -g npm # 升级npm
cnpm cache clean -f # 清除npm缓存

# 更新hexo:进入<blog>目录,执行如下命令:
# 更新package.json中的hexo插件版本
cnpm install -g npm-check
cnpm install -g npm-upgrade
npm-check
npm-upgrade
# 更新npm所有插件
cnpm update
# 检查hexo版本
hexo -v
创建文章&页面
hexo new "<post>" # 在博客根目录/source/_posts文件夹下按格式生成md文件
hexo new <page-name> # 生成对应页面,具体参考官方文档
日常排错
部署报错
FATAL {
	err: Error: Spawn failed
			at ChildProcess.<anonymous> (D:\xxx\node_modules\hexo-util\lib\spawn.js:51:21)
			at ChildProcess.emit (events.js:315:20)
			at ChildProcess.cp.emit (D:\xxx\node_modules\cross-spawn\lib\enoent.js:34:29)
			at Process.ChildProcess._handle.onexit (internal/child_process.js:217:12) {
		code : 128
		}
} Something's wrong. Maybe you can find the solution here: %s
https://hexo.io/docs/troubleshooting.html
问题描述:本地测试毫无问题,但是部署时反复报错,以下列出我尝试的解决方案。
方法一
删除博客根目录文件下的.deploy-git文件夹,然后重新部署。
hexo clean && hexo g -d
方法二
检查自己提交的分支是否和GitHub上的仓库分支一致。
方法三
网上能搜的我都搜了…然后试了试特仑苏说的挂个代理。因为本地部署没问题,问题只可能出在网络上。
打开gitbash设置代理:
vim ~/.gitconfig # 修改git配置文件
# 添加代理
[http "http://github.com"]
		proxy = socks5://127.0.0.1:<port>
[https "https://github.com"]
		proxy = socks5://127.0.0.1:<port>
10808端口是v2ray的默认端口,具体的可以在参数设置里面查看。
至此,博客成功部署。
优化访问
CDN加速
由于博客部署在GitHub,访问极不稳定,所以使用了Cloudflare的服务。
CloudFlare:Cloudflare - The Web Performance & Security Company | Cloudflare
参考资料:
透過 Freenom 幫 Heroku 網址做 Cloudflare 的設定(Domain 買起來!!) · 小菜的 Blog (riverye.com)
构建Gitee图床
用Typora写博客需要图床,图片放在GitHub加载太慢(最近在学校经常被墙)。
注:Gitee图床现已屏蔽外链不可用,读者可依据本教程自行构建GitHub图床或选择其它图床。
PicGo(Windows)
需求准备:
PicGo:Molunerfinn/PicGo: A simple & beautiful tool for pictures uploading built by vue-cli-electron-builder (github.com)Gitee:Dashboard - GiteeTypora:Typora — a markdown editor, markdown reader.Node.js:https://nodejs.org/
PicGo&Gitee配置
Gitee
我们先来创建图床仓库。
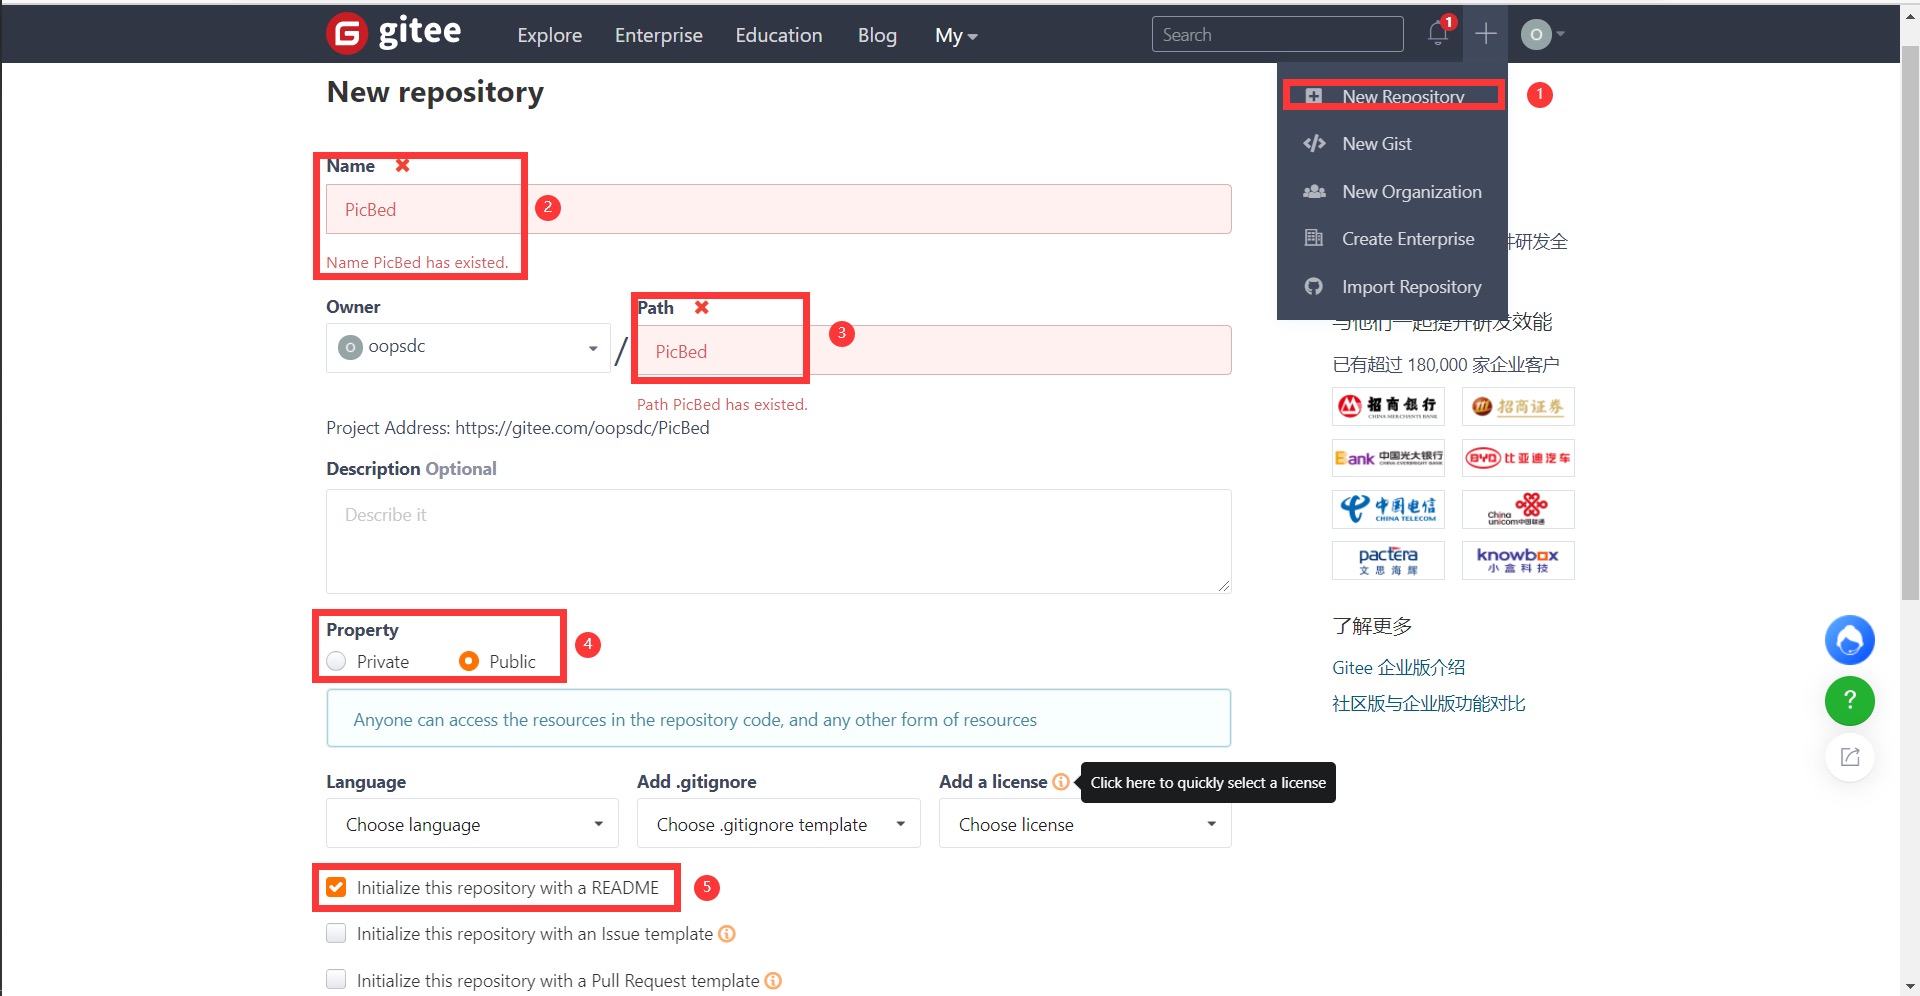
之后我是填写了二级文件夹的,那么我们就需要创建对应文件夹。
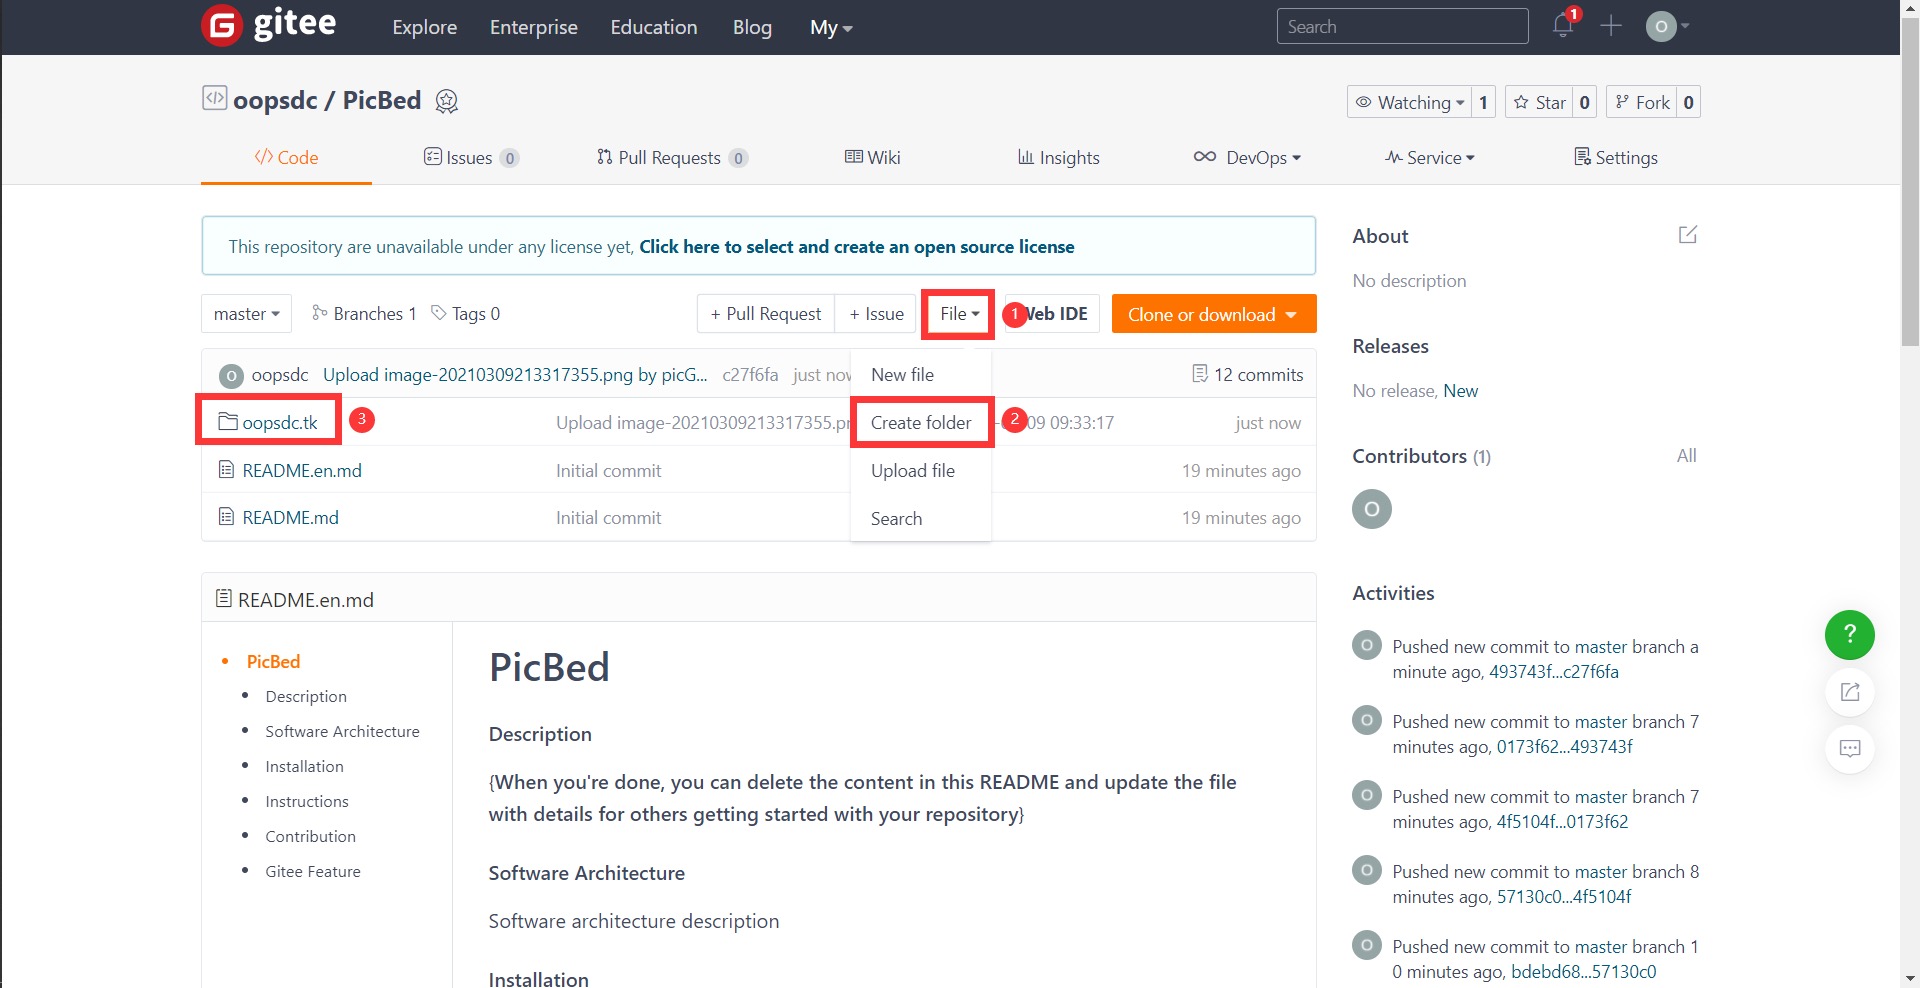
最后就是token申请:
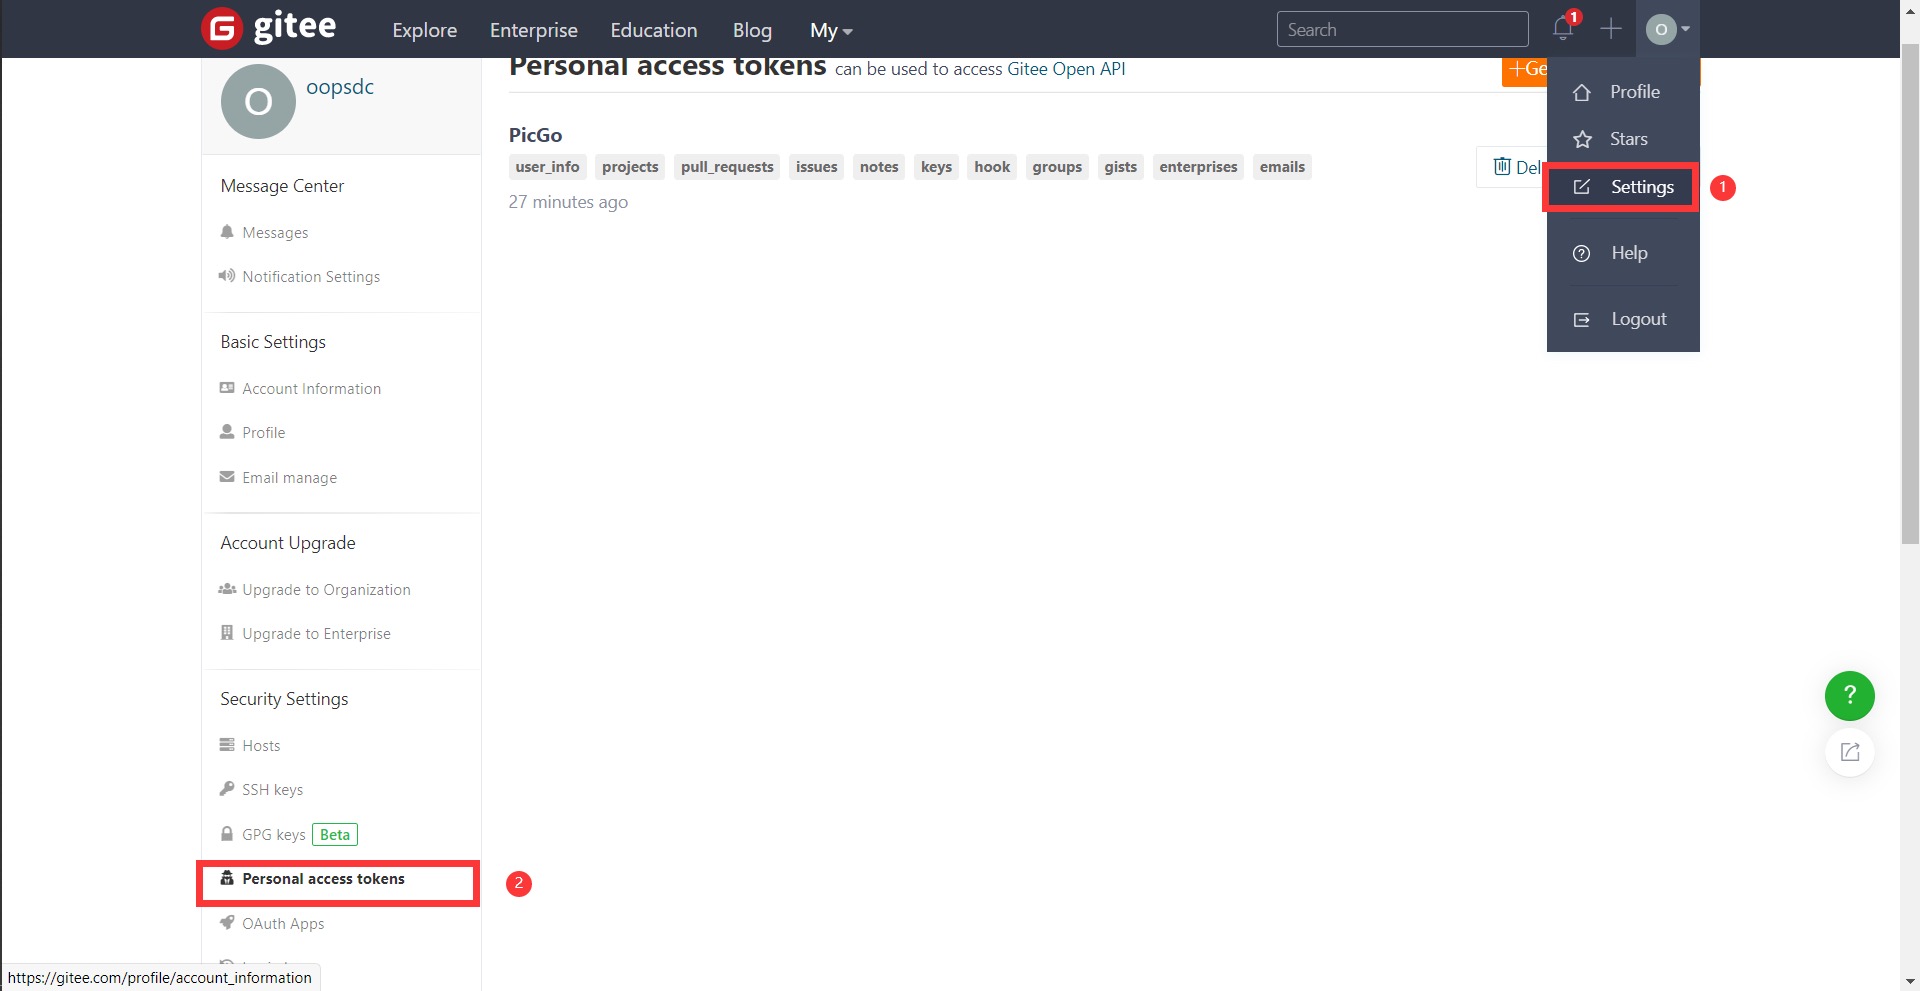


PicGoApp
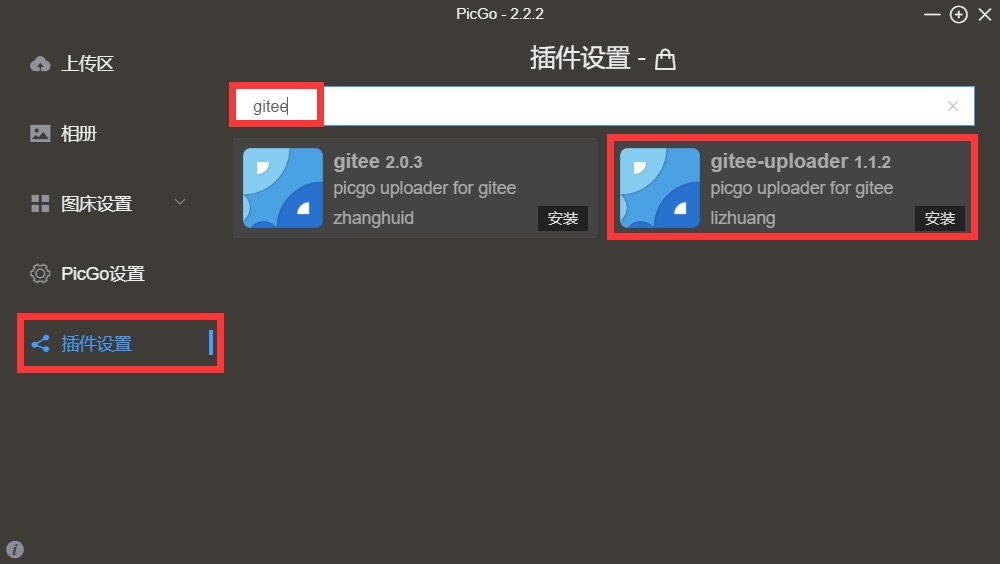
一路安装即可,如需更改路径请自行选择,接下来以2.2.2版本为例。
我们首先安装对应插件。
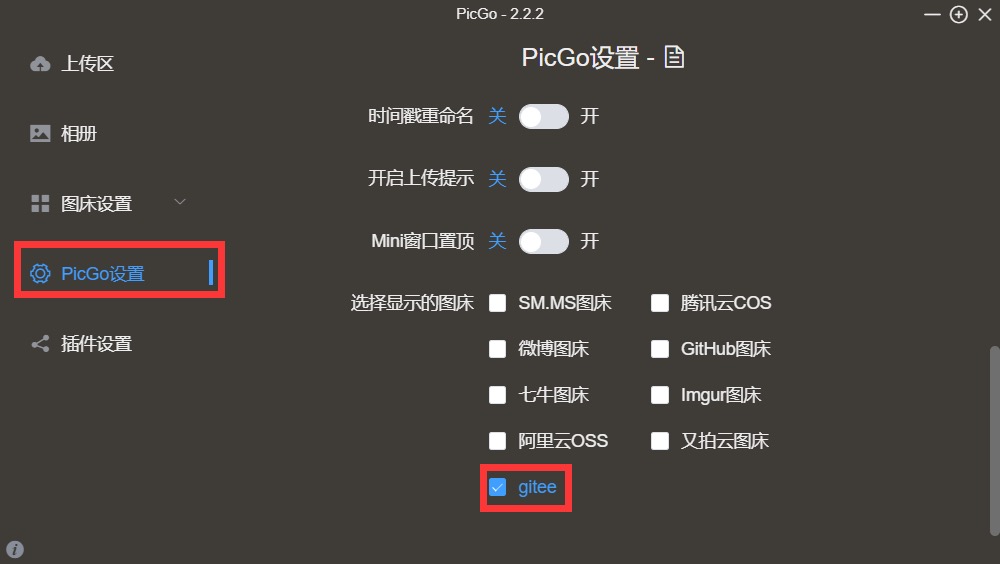
安装好之后进入PicGo设置,勾选gitee选项。
下一步进入图床设置下的gitee,我的设置如图。
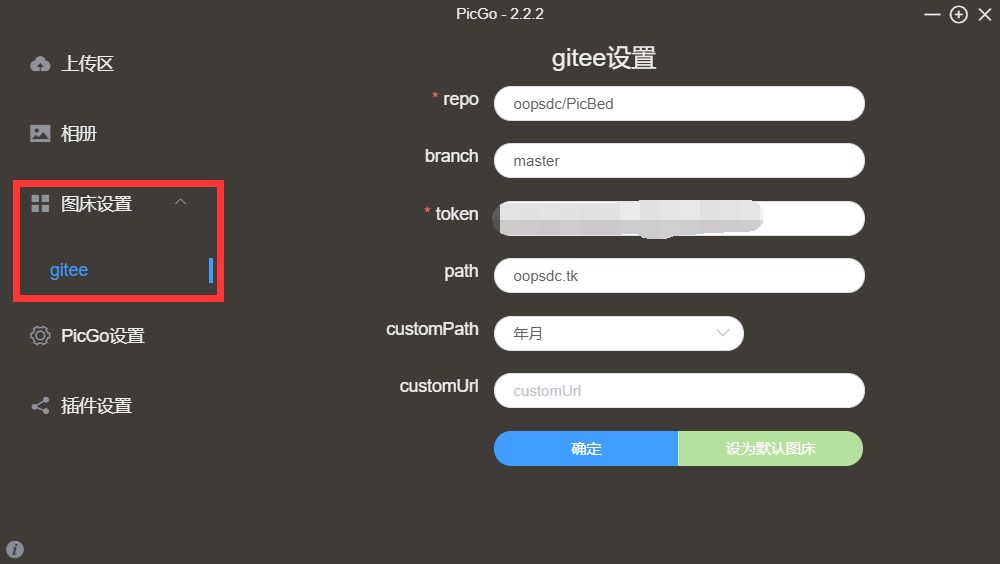
repo		:	用户名/仓库名
branch		:	分支
token		:	个人口令
path		:	仓库下的二级文件夹
customPath	:	自定义路径
customUrl	:	自定义URL
接下来我们讲Typora的配置。
若要使用PicGo(app),则必须设置语言为中文
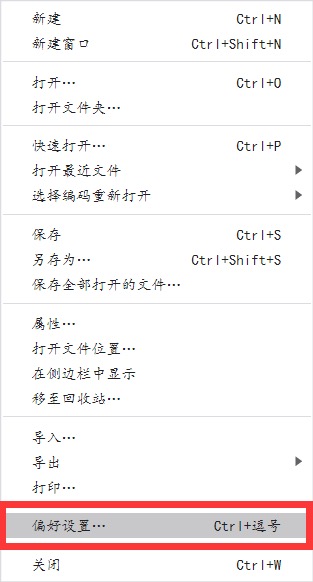
打开Typora,进入偏好设置。
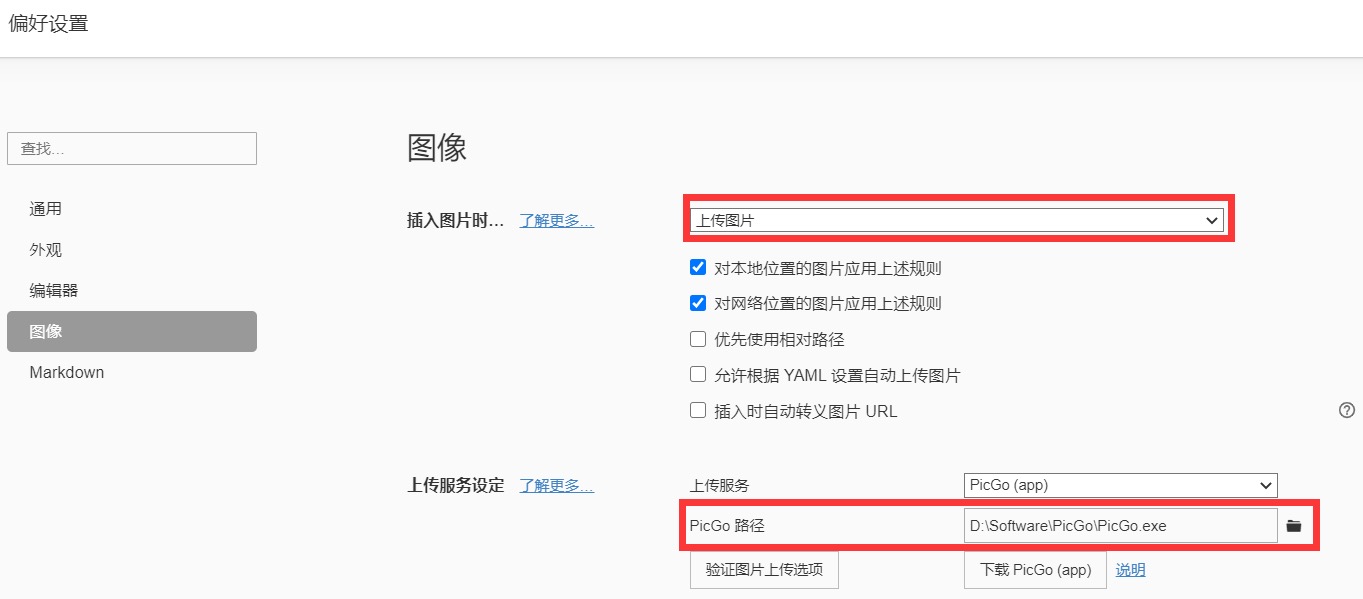
至此,在Typora插入图片时就会自动上传到Gitee仓库图床。
PicGoCore(推荐)
官方文档:Upload Images (typora.io)
中文文档:配置文件 | PicGo-Core
PicGoApp每次上传图片都需要应用程序在后台运行,因此我们再介绍一下使用无感的PicGoCore。
Typora原生支持PicGoCore,所以我们可以直接在Typora里安装,此处是安装完成的界面。
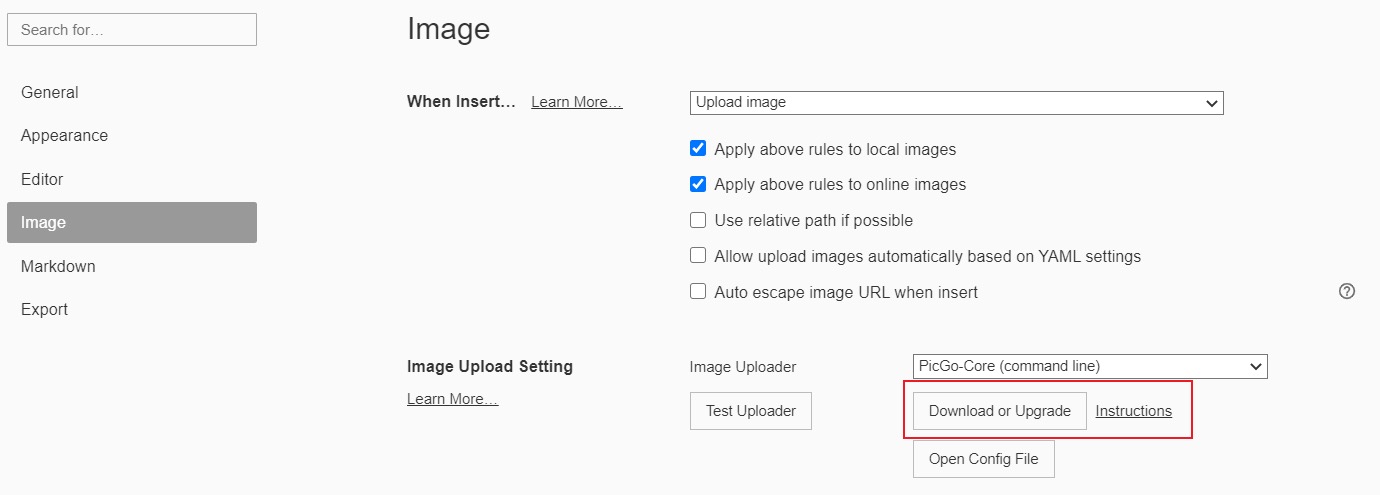
安装完成之后,可以点击测试上传按钮获取插件安装路径,打开cmd,切换到对应目录:
# 注:此处需要nodejs环境
cd C:\Users\<user>\AppData\Roaming\Typora\picgo\win64
.\picgo.exe install gitee-uploader
# 以下为安装smms和github插件
.\picgo.exe install smms-user
.\picgo.exe install github-plus
安装好之后,点击打开配置文件,会发现有一些基础的配置,以下提供了三个插件的配置,按个人需求选择复制即可:
{
  "picBed": {
    "current": "gitee",
    "uploader": "gitee",
    "gitee": {
      "branch": "master",
      "customPath": "yearMonth",
      "customUrl": "",
      "path": "img/",
      "repo": "<gitee用户名/gitee仓库名>",
      "token": "<自己的token>"
    },
    "githubPlus": {
      "branch": "master",
      "customUrl": "https://cdn.jsdelivr.net/gh/<用户名>/<项目名>",
      "path": "img/",
      "repo": "<github用户名/github仓库名>",
      "token": "<自己的token>"
    },
    "smms-user": {
      "Authorization": "<替换成自己的token>"
    },
    "transformer": "path"
  },
  "picgoPlugins": {
    "picgo-plugin-gitee-uploader": true,
    "picgo-plugin-smms-user": true,
    "picgo-plugin-github-plus": true
  },
  "picgo-plugin-gitee-uploader": {
    "lastSync": "2021-06-20 00:00:00"
  },
  "picgo-plugin-github-plus": {
    "lastSync": "2021-06-20 00:00:00"
  }
}
由于某些原因,
GitHub不太稳,所以githubplus插件的customUrl使用了cdn
复制完成后,填写之前PicGoApp中的参数即可。
再次点击上传测试,成功的话,我们已经能通过PicGo上传图片到Gitee对应仓库了。
uPic(Mac)
uPic&Gitee配置
uPic是一款Mac图床客户端,由于PicGo配置起来没有uPic简便,所以使用了uPic。
安装uPic
方式一:
brew install upic
方式二:
打开Typora的偏好设置,选择图片,文件上传选择uPic,点击下载uPic即可自动跳转到下载页面。
方式三:
参数配置
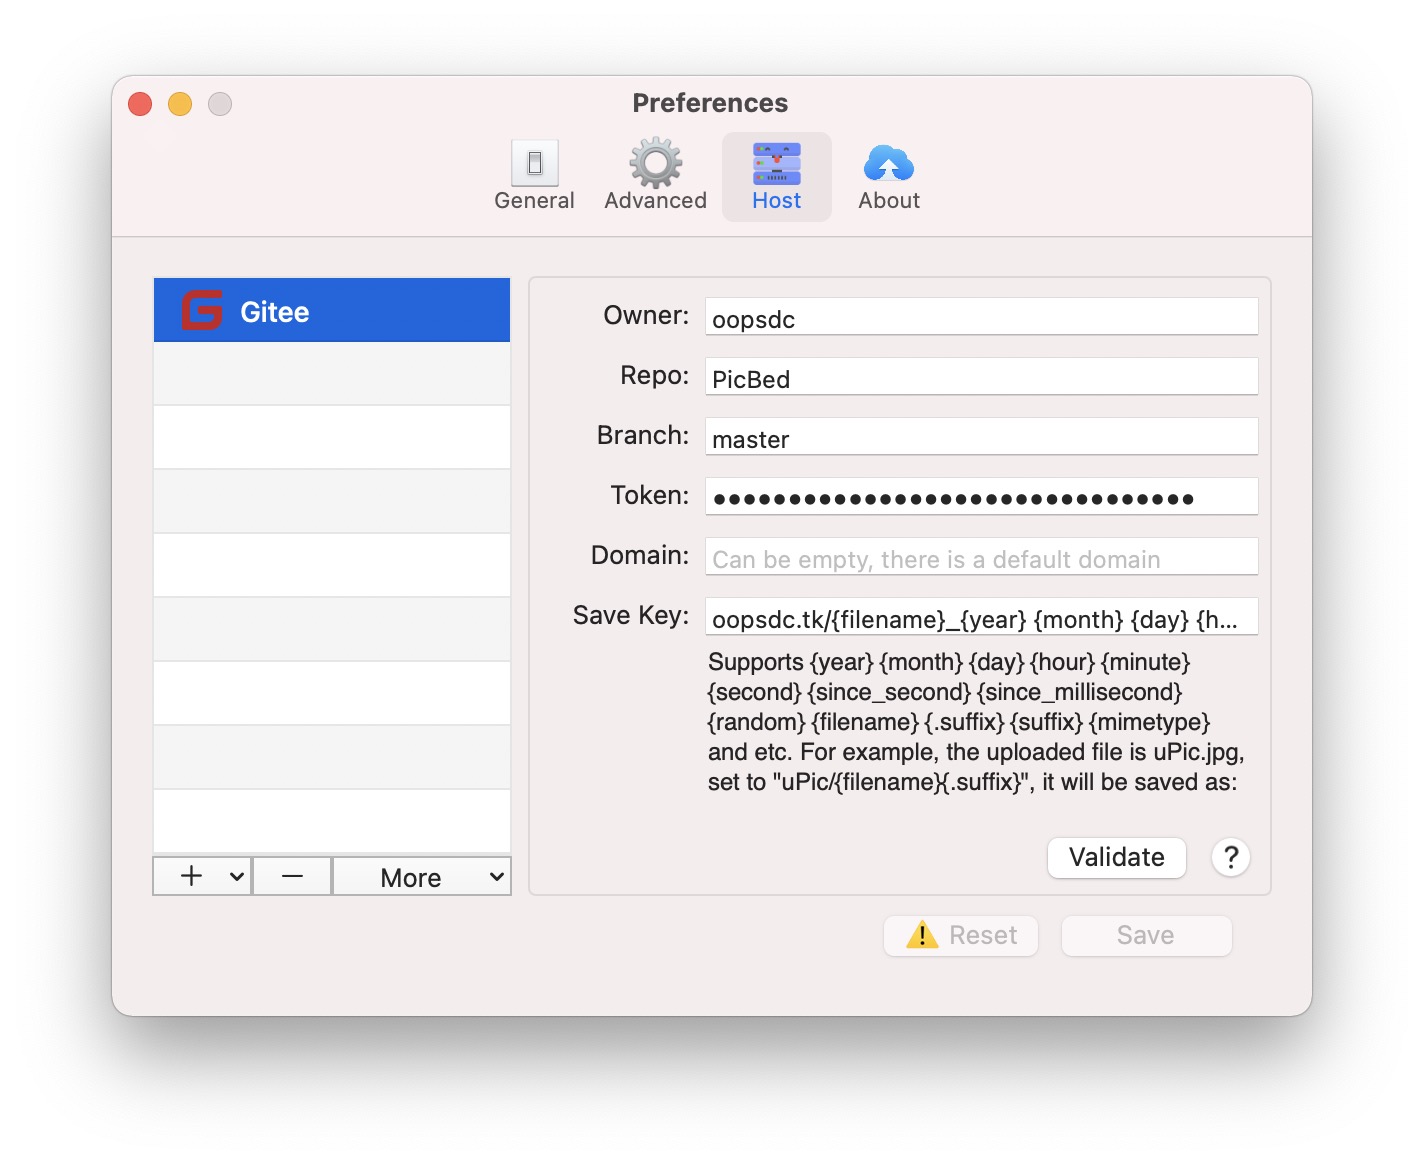
从上到下依次为:
用户名	:	即gitee用户名
仓库名	:	自建一个公开仓库即可,详见PicGo配置
分支	:	默认为master,没有特殊需求不用管
token	:	详见PicGo配置
域名	:	可不填
保存位置	:	以截图为例,上传图片保存在我的 PicBed 仓库下的 oopsdc.tk 目录中,保存格式为文件名+年月日,可依据需求自行调整
Typora设置如下:
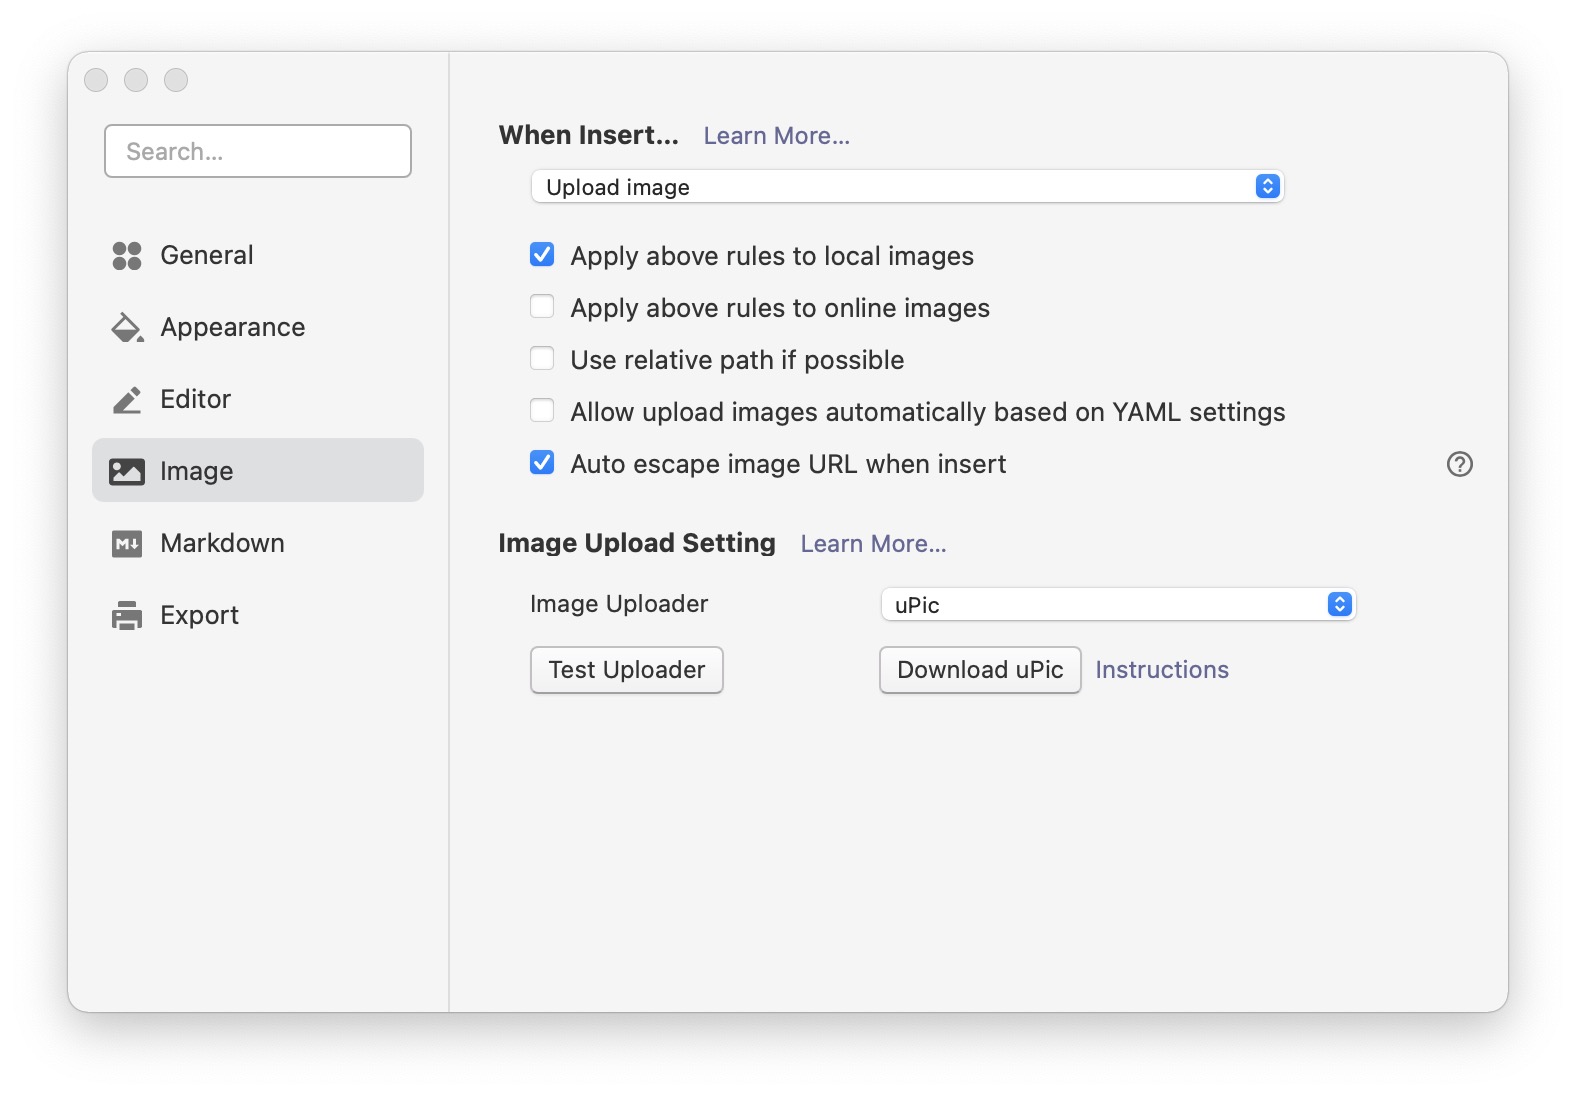
参数讲解:
当插入图片时,上传图片
规则针对本地文件
插入图片时对URL进行转义
点击测试上传即可验证。
文章许可:本文采用CC BY-NC-SA 4.0许可协议,转载请注明出处。